Sunday, October 31, 2010

Weekly Meal Planning, Week of 11.1.10

Happy Halloween, everyone! Tomorrow is the first day of November (I can't believe November is here already!), which means the beginning of NaBloPoMo. I'm participating again this year, so you'll be getting a post from me every day during the month of November! I'm kicking it off tomorrow with the pumpkin doughnut mini muffins I made yesterday. Believe me, you do not want to miss this recipe!

Here's what we'll be eating this week.

Monday
: Spinach artichoke chicken melts, chips. I never got around to making these a couple of weeks ago, and they’re still on my mind, so I am definitely making them tomorrow!

Tuesday: Chili potato burritos

Wednesday: Roasted broccoli alfredo

Thursday: Fried egg tostadas with sausage, spinach and tomatoes, roasted potatoes

Friday: No cooking

Saturday: Roasted vegetable subs with pesto mayonnaise, chips

Sunday: Creamy minestrone and meatball soup, garlic bread

Friday, October 29, 2010

Pumpkin Pie-Spiced Pumpkin Seeds

I’m probably posting this recipe a little bit late, since I’m sure most of you have already carved and roasted (or disposed of -- the horror!) your pumpkin seeds. But if your family saved the carving for the last minute like mine did, I’m telling you: You have got to try these roasted pumpkin seeds.

Typically I do up my pumpkin seeds pretty simply: olive oil, salt and pepper, maybe some ground red pepper for spice. But this year, I decided to do something different. I was intrigued by the idea of sweet pumpkin seeds rather than savory, and this is what I came up with. I was originally planning to use just cinnamon and sugar, but then I heard the nearly-full container of pumpkin pie spice calling my name from the cupboard, and I decided to use that instead. So, these pumpkin pie-spiced pumpkin seeds were born. And oh my, are they delicious!

It’s not a huge deal if your seeds are a little wet when you get ready to roast them, but ideally, it’s best to leave them spread in a single layer on a cookie sheet overnight so they can de-gummify and dry out. That’s what I did, and I whipped these up in 15 minutes last night before we left for trick-or-treating. You know, so my Andrew could have a semi-healthy snack before he went out and gathered all that candy. :) They made the house smell amazing, and they tasted even better: crunchy and earthy and sweet. Considering how much my family and my co-workers loved them, I think I’ll be forced to make them every year from now on!

Pumpkin Pie-Spiced Pumpkin Seeds

1 heaping cup pumpkin seeds, rinsed and dried
3 tablespoons white sugar
1 teaspoon pumpkin pie spice
4 tablespoons melted butter

1. Preheat oven to 350 degrees.

2. In a small bowl, stir together sugar and pumpkin pie spice. Add pumpkin seeds and toss to combine. Pour melted butter over seeds and mix until all the seeds are coated.

3. Spread in a single layer on a greased cookie sheet and roast, stirring frequently, 10 to 12 minutes or until browned and crisp.

Print

Thursday, October 28, 2010

Cheesy Roasted Tomato Bread

I think we’re past the point in our relationship where I need to reiterate my love for roasted tomatoes yet again. I think you all know by now how smitten I am with them. A while ago, shortly after I tasted them on my new favorite panini, I started thinking about how delicious they would be piled up on garlic bread and smothered with cheese. And so, this recipe was born.

This is a delicious alternative to basic garlic bread, and it offers the perfect balance of textures and flavors. The bread is so crispy, the tomatoes are so soft, the cheesy is so gooey, and the sweetness of little cherry tomatoes pairs so nicely with the garlicky flavor. After his first bite, Joe told me, “You need to blog about this as soon as possible. You can’t keep this from the world any longer.” Well, I didn’t blog about it right away, but I’m sharing it with you now, and that’s all that matters, right?

Not only is this so quick and easy, it’s also endlessly adaptable. It would be delicious with sautéed mushrooms and onions, or with roasted peppers. Smoked cheese -- or any type of cheese, really -- would be delicious. Try using a fresh herb like basil or parsley to brighten it up. Play around with the method and flavors to suit your tastes. I think you’ll love this recipe!

Cheesy Roasted Tomato Bread

1 pint cherry or grape tomatoes
1 tablespoon balsamic vinegar
Salt and pepper to taste
1/4 cup plus 2 tablespoons olive oil, divided
2 garlic cloves, smashed

1 teaspoon Italian seasoning
3 bolillo or sweet Italian rolls, split in half (6 pieces total)
Shredded mozzarella cheese
Freshly grated parmesan cheese

1. Preheat oven to 450 degrees. On a baking sheet lined with aluminum foil, toss the tomatoes with the balsamic vinegar, 2 tablespoons olive oil, and salt and pepper to taste. Roast, stirring frequently, 10 to 12 minutes or until tomatoes begin to burst.

2. Meanwhile, heat 1/4 cup olive oil, smashed garlic cloves, and Italian seasoning in a small skillet over low heat. Cook for 5 to 10 minutes, until the oil has fully absorbed the garlic flavor. Discard garlic cloves.

3. Brush each piece of bread with garlic-flavored olive oil. Broil until nearly crisp.

4. Top bread with roasted tomatoes and a sprinkle of cheeses. Return to oven and broil a couple of minutes more, just until cheese is melted. Serve.

Print

Wednesday, October 27, 2010

Chicken with Pesto Mushroom Cream Sauce

First of all, I need to apologize for the terrible picture. It was taken on a night when there wasn’t a lot of light left in my kitchen (those are happening more and more frequently now that it’s getting darker earlier, SOB), and I was so eager to eat this that I really didn’t bother to take the time to try to get a good shot. So, sorry.

I hope the picture doesn’t deter you from trying this, though, because let me assure you: This chicken dish is amazing. Earthy mushrooms are paired with pungent garlic, sweet cream, verdant pesto, and bright fresh lemon juice to make a sauce with a perfectly balanced flavor profile. In less food critic-y terms, this stuff is just yummy. :)

I served ours over angel hair pasta tossed with a touch of butter and parmesan cheese and a side of cheesy roasted tomato bread (recipe coming tomorrow!) and we were all very, very satisfied after dinner. This is great comfort food, especially now that the weather’s starting to cool down for real. And as an added bonus, this looks and sounds really fancy and is worthy of company, but it went from pan to table in less than 30 minutes. Bestill my heart, it just may be the perfect meal.

Chicken with Pesto Mushroom Cream Sauce
adapted from Joelen’s Culinary Adventures

4 boneless, skinless chicken breasts (about 1 1/2 pounds)

Salt and pepper to taste
1 tablespoon olive oil
2 tablespoons butter

8 ounces button mushrooms, sliced
6 garlic cloves, minced
1 cup heavy cream
1/2 cup chicken broth
1/4 cup prepared basil pesto
2 tablespoons lemon juice

1. Pat chicken dry with paper towels and season with salt and pepper. Heat 1 tablespoon of oil in a large skillet over medium-high heat until just smoking. Cooking chicken until golden brown, about 3 minutes per side. Transfer to plate and tent with foil.

2. Add 2 tablespoons butter to skillet and cook mushrooms until browned, about 5 minutes. Stir in garlic and cook until fragrant, about 30 seconds. Add cream, broth and chicken to skillet, scraping up any browned bits, and bring to a boil. Reduce heat to low, and cover and simmer until chicken is cooked through, about 15 minutes.

3. Transfer chicken to serving platter and tent with foil. Return skillet to high heat and simmer until sauce is thickened, about 5 minutes. Off heat, stir in pesto and lemon juice and season with salt and pepper. Serve sauce on the side or over chicken.

Print

Tuesday, October 26, 2010

Asian Wonton Chicken Salad

I know that posting a salad recipe right now, when everyone else is starting to share recipes for hearty casseroles and comforting soups, seems a little odd. However, I maintain that there is no unacceptable time of year to enjoy fried wontons. Who’s with me?

And the crispy fried wontons are just one of this salad’s delicious elements. The other? A to-die-for sweet sesame dressing that I would be perfectly happy to drink from a straw. Throw in some poached chicken, some crisp romaine, and lots of fresh veggies, and you have the perfect Asian salad. You can make every part of it ahead of time and throw it together on a night you need a quick, effortless dinner.

(And by the way, I feel the need to mention that this is very kid-friendly. Give your little one some chicken, veggies, cashews and wontons and a little dish of dressing for dipping, and they’ll love it. At least, mine did!)

Asian Wonton Chicken Salad
slightly adapted from Our Best Bites

For the dressing:
2/3 cup rice vinegar

1 cup canola oil
2 tablespoons sesame oil
4 cloves garlic, pressed or very finely minced
2 tablespoons soy sauce
1/2 cup sugar
4 tablespoons sesame seeds

For the salad:
2 heads romaine lettuce
3 chicken breasts, cooked and cubed or shredded
Cherry tomatoes
1 cucumber, sliced
Cashews

1/2 package wonton wrappers
Vegetable oil for frying

1. Place all ingredients for salad dressing into a quart jar (or something equivalent) and shake vigorously. Set aside.

2. Heat about 1 inch of oil in a pot on the stove top. Use pizza cutter or sharp knife to cut wontons into three strips. Fry wontons a few at a time and set on paper towels to dry.

3. Tear clean lettuce into chunks and place in a large salad bowl. Top with cherry tomatoes, sliced cucumber, and cashews. Add shredded chicken and top with dressing. Toss salad together. Once everything is well coated, add wonton strips and gently toss to combine.

Print

Monday, October 25, 2010

Brown Sugar Bacon Waffles

I don’t make waffles at home very much. Our waffle iron is small and old and crotchety and…well. You get the idea. It sucks, is what I’m saying.

HOWEVER. When I saw this recipe, I knew it would be worth the mess and the hassle. Brown sugar-coated bacon. In a waffle. Doused in maple syrup. Um, where do I sign up to eat that EVERY DAY FOR THE REST OF MY LIFE?

We loved these waffles, which should be a surprise to exactly no one. I did wish they were a bit sweeter, so next time I make these I’ll add an additional quarter cup of brown sugar to the batter. Served with some cheesy hash browns on the side, these waffles were the perfect breakfast-for-dinner treat.

There are few things on this earth that taste as good as bacon caramelized in brown sugar. So even though the recipe only calls for 10 strips, I recommend making a full pound of bacon so you’ll have some left over for snacking. Trust me, you’ll want to snack.

Brown Sugar Bacon Waffles
from Joy the Baker

10 slices of bacon
1/4 cup brown sugar

3 cups all-purpose flour
1 tablespoon baking powder
1 teaspoon baking soda
1 teaspoon salt
1/4 cup brown sugar
2/3 cups canola oil
4 large eggs
2 teaspoons vanilla extract
2 1/2 cups buttermilk

1. Preheat oven to 375 degrees. Spray a baking sheet with non stick cooking spray and line with foil. Arrange bacon in a single layer on the baking sheet. Sprinkle generously with 1/4 cup brown sugar. Place in the upper third of the oven and bake until sugar is caramelized and bacon is brown and crispy, about 10 to 15 minutes. Remove from oven. Immediately remove bacon slices using a pair of tongs. Place them on a cutting board to cool before chopping. Once cool, chop the bacon into bite size pieces and set aside.

2. Meanwhile, set up your waffle iron on a level, clean surface and turn on to preheat.

3. In a large bowl combine flour, baking powder, baking soda, salt and 1/4 cup brown sugar. Whisk to blend. In a medium bowl, whisk together eggs, oil, buttermilk and vanilla extract. Add the wet ingredients to the dry ingredients and fold. Once almost fully incorporated, add the bacon. Stir.

4. Cook according to your waffle machine instructions.

Print

Sunday, October 24, 2010

Weekly Meal Planning, week of 10.25.10

*knock knock knock*

Is this thing on?


Oh, hi. Sorry for disappearing last week. Things were pretty crazy at both work and home, so I barely had time to
breathe, let alone blog. But I promise I'll be back with a new recipe tomorrow. Cross my heart. In the meantime, here's our meal plan for the week.

Monday
:
Cabbage and noodles, rolls

Tuesday:
Salsa ranch burgers, fries

Wednesday: Bean and cheese baked taquitos,
Mexican sour cream rice

Thursday:
Onion chowder with cheesy onion popovers

Friday: Pizza night

Saturday:
Braised chicken thighs with mushrooms and bacon, roasted broccoli, mashed potatoes

Sunday: BBQ beef shepherd’s pie (adapted, because boxed potato products are the one thing I’m a little snobby about)

Tuesday, October 19, 2010

Creamy Vegetable Enchiladas

Well this has been quite a week so far, and it’s only Tuesday. Yesterday I felt like a hamster in a wheel all day long, running and running and running and getting absolutely nowhere, and today hasn’t proven to be much better. So I’m sorry for not posting yesterday, but I only had time for one blog post, and writing about my baby boy’s first word (his brother's name, swoon) seemed just a little bit more important than these enchiladas.

That’s not to say these enchiladas aren’t delicious, though, because they are. They’re stuffed with vegetables and cheese, and they’re incredibly satisfying, even without any meat. You can customize them to your preferences, using any veggies you like and whatever cheese suits your fancy.

Do you want to hear something funny? I actually had to go back in my Twitter stream to see exactly what ingredients I used for these. According to Twitter, I made these 59 days ago. I mentioned them in a tweet and someone asked for the recipe, and I replied to her with the ingredients. Thank goodness for Twitter! I make so many different recipes, and I’m so far behind in posting them, that I really do need to jot down what I do as I’m doing it. Lesson learned!

Anyway, give these a shot. I think you’ll love them. The recipe does make a lot, so I ended up freezing 5 or 6 enchiladas for a later meal. I can't wait to enjoy these again on a night I just don't feel like cooking!

Creamy Vegetable Enchiladas

1 medium zucchini, cubed
1 red bell pepper, chopped
1 8-ounce can sliced mushrooms, drained
1 bunch green onions, sliced
2 garlic cloves, minced
1 can corn, drained
1 can black beans, rinsed and drained
1 10-ounce package chopped frozen spinach, thawed and well-drained
1 teaspoon chili powder
1/2 teaspoon cumin
Salt and pepper to taste
1 8-ounce package cream cheese, softened
2 cups shredded colby cheese, divided
1 1/2 cups sour cream, divided
1 jar salsa, divided
6- or 8-inch flour tortillas

1. Preheat oven to 425 degrees.

2. Heat a small amount of olive oil in a large skillet over medium high heat. Add zucchini, bell pepper, and mushrooms and sauté until vegetables begin to soften. Stir in green onions and garlic; cook and stir 30 seconds.

3. Stir in corn, black beans, spinach, chili powder, cumin, and salt and pepper to taste. Transfer mixture to a large bowl.

4. Mix vegetables with cream cheese, 1 cup shredded cheese, 1/2 cup sour cream, and 1/2 cup salsa. Divide evenly among flour tortillas and roll up. Place seam-side down in a greased 9 x 13-inch baking dish.

5. In a separate bowl, combine remaining salsa with 1 cup sour cream. Pour over enchiladas in pan and top with remaining 1 cup cheese. Bake uncovered for 25 minutes or until enchiladas are heated through and cheese is melted.

Print

Sunday, October 17, 2010

Weekly Meal Planning, Week of 10.18.10

Monday: Chili macaroni and cheese

Tuesday
: Taco puffs

Wednesday: Sesame chicken with rice, steamed broccoli

Thursday: Creamy roasted tomato pesto pasta

Friday: Pizza night

Saturday: Sausage-stuffed acorn squash

Sunday: The boys are on their own, because I’m going to the So You Think You Can Dance show with my stepmom and stepsister. Yay for girls’ nights!

Friday, October 15, 2010

Bacon, Roasted Tomato, and Provolone Panini

You know what I love? Roasted tomatoes. I don’t think I’ve ever mentioned that before. (Oh. Wait.) I also love sandwiches, specifically the grilled kind, so putting roasted tomatoes on a panini seemed like a natural thing to do.

Frankly, I could have eaten just the roasted tomatoes slapped between two slices of bread, but to make things just a little bit more interesting for the rest of my family, I decided to add some other stuff to the panini too. Namely: bacon, so the sweet tomatoes would have a salty, smoky counterpart; gooey, melty provolone cheese, because every good sandwich needs cheese; and pesto mayonnaise, because I love the stuff and would eat it in just about any application, including directly off of a spoon. I put it all between two slices of hearty 12-grain bread, grilled it until crispy, and devoured it. And then I died from the deliciousness. Then I came back to life and ate another one. Then I died again. Do you see the pattern here?

(This recipe makes four sandwiches.)

Bacon, Roasted Tomato, and Provolone Panini

1 pint grape or cherry tomatoes
2 tablespoons olive oil
1 tablespoon balsamic vinegar
Salt and pepper to taste

1/2 cup mayonnaise
1/4 cup prepared pesto

12 slices bacon
4 slices provolone cheese
8 slices 12-grain or other hearty bread

1. Preheat oven to 450 degrees. In a medium bowl toss the tomatoes with olive oil, balsamic vinegar, salt and pepper. Line a baking sheet with foil and pour the tomatoes onto it. Place in preheated oven and cook for 10 to 12 minutes or until the tomato skins burst. Remove from oven and gently mash with a potato masher.

2. Meanwhile, cook bacon in a large skillet until crisp; drain on paper towels. Combine mayonnaise and pesto in a small bowl; set aside.

3. To assemble sandwiches, spread each slice of bread with the pesto mayonnaise. Top 4 slices with a piece of cheese, three slices of bacon, a quarter of the roasted tomatoes, and another slice of bread.

4. Cook on a panini press until bread is slightly browned and crisp.

Print

Thursday, October 14, 2010

Chipotle Cheddar Meatloaf Muffins

I don’t know about you guys, but I think meatloaf has always gotten a bad rap. The word itself doesn’t help matters; a loaf of meat sounds less than appetizing. But as for me, I grew up loving the stuff. My mom was such a good cook, I never had a reason not to love anything she made, including meatloaf. In addition to her basic (but still delicious) version, she often made a Cajun version of meatloaf that will always be my go-to.

But if I had to choose a second favorite meatloaf, this recipe would definitely be it. I love the flavor of chipotle peppers, but I’ve always avoided working with them because I didn’t want to buy an entire can and let most of it go to waste. Then I read Beth’s tip about pureeing the entire can of chipotles in adobo and freezing tablespoon-sized portions in an ice cube tray. That way, if you need some for a dish, all you have to do is pop one or two of the frozen cubes out and let them thaw. No waste.

Armed with this new knowledge, I knew I had to make Beth’s chipotle cheddar meatloaf as soon as she posted it. To reduce the cooking time, I actually turned the recipe into meatloaf muffins, which I think are absolutely adorable.


Joe and I loved this meatloaf. We made it with ground beef, but I think ground turkey would work well here too. It was incredibly flavorful with the perfect amount of heat, and I loved the texture the tortilla chips gave the filling. Add some chili sauce for a spicy-sweet element and some gooey, melty cheese running through the entire thing, and it was just...Mmmm. SO GOOD. Thanks for a great recipe, Beth!

Chipotle Cheddar Meatloaf Muffins
adapted from Not A Real Housewife

1 pound ground beef

1 1/2 cups shredded cheddar cheese, divided
1 tablespoon chipotle in adobo puree
1/2 cup chili sauce, divided
1/2 cup chopped onion
1/2 cup crushed tortilla chips
1 egg
1/2 teaspoon salt

1. Combine meat, 1 cup cheese, chipotle puree, 1/4 cup chili sauce, onion, tortilla chips, egg and salt. Mix well. Divide into 12 equal portions and place in a greased muffin tin. Brush remaining 1/4 cup chili sauce over the top of each portion.

2. Bake at 400 degrees for 20 to 25 minutes or until cooked through. Sprinkle remaining 1/2 cup cheese evenly over each portion. Cook for 5 more minutes or until cheese is melted. Let stand 5 minutes before serving.

Print

Wednesday, October 13, 2010

Ranch Macaroni and Cheese

Bold statement time: This is seriously the best macaroni and cheese I’ve ever had. Even better than this, which was my former favorite. This version of mac and cheese is so tangy and creamy and flavorful and interesting. Best of all, it’s ready in the time it takes to cook the pasta. Serve it with a vegetable on the side as a vegetarian meal, or serve it as a side dish, it really doesn’t matter: Just make sure you MAKE THIS. SOON.

Ranch Macaroni and Cheese
adapted from Taste of Home

1 pound macaroni
1 cup milk
1/4 cup butter, cubed
1 envelope ranch salad dressing mix
1/2 teaspoon garlic powder
Salt and pepper to taste
1 cup shredded Monterey Jack cheese
1 cup shredded Colby cheese
1 cup sour cream
1/2 cup crushed Ritz crackers
1/3 cup grated Parmesan cheese

1. Cook macaroni according to package directions. Meanwhile, in a Dutch oven, combine the milk, butter, dressing mix, garlic powder and salt and pepper; heat through. Stir in Monterey Jack and Colby cheeses until melted. Stir in sour cream.

2. Drain macaroni; stir into cheese sauce with the Ritz crackers. Sprinkle with Parmesan cheese.

Print

Tuesday, October 12, 2010

Texas BBQ Sloppy Joes

I love sloppy joes. I love all things barbecued. So when I saw this recipe, which combines those two loves, and then puts them on top of a piece of buttery Texas toast, I was instantly sold.

These are just as delicious as I thought they’d be. They remind me a lot of these burgers, but I think they taste even better. They definitely come together a lot more quickly. The sloppy joes themselves are tangy and flavorful, and when you combine them with crispy Texas toast and gooey melted cheese, it’s the perfect balance of textures and flavors. This one is a go-to, for sure.

Texas BBQ Sloppy Joes
adapted from Tried-and-True Cooking with Heidi

1 1/3 pounds lean ground beef
1 onion, chopped

1 14.5-ounce can diced tomatoes with green chilies
1/2 cup ketchup
1 cup bottled barbecue sauce
1 tablespoon brown sugar

1 tablespoon Worcestershire sauce
1 package frozen garlic Texas toast
1/2 cup shredded sharp cheddar cheese

1. Brown ground beef and onion in large skillet over medium-high heat, stirring often, 8 to 10 minutes or until beef is no longer pink; drain well. Return to skillet.

2. Stir in tomatoes with green chilies, ketchup, barbecue sauce, brown sugar, and Worcestershire sauce. Season with salt and pepper to taste. Cover and cook 10 minutes.

3. Meanwhile, prepare Texas toast according to package directions. Serve beef mixture over Texas toast; sprinkle with cheese.

Print

Monday, October 11, 2010

Fall Minestrone

I have the perfect fall soup for you today. This was one that our entire family enjoyed; Will loved the sweet potatoes and the beans, and Andrew loved the ditalini pasta (which, by the way, he ate by sticking his fingers in the holes in the noodles, and sucking them off of his fingers once he had a full hand of pasta. It was adorable).

But never mind my child’s strange eating habits. Let me tell you about this hearty, flavorful soup. It’s incredibly satisfying and filling, but it’s also really healthy for you. It’s packed with vegetables, beans, and a little bit of pasta to give it body. All you need is a buttered roll to dip in the flavorful broth, and it’s the perfect supper for a chilly autumn night. And it’s something you can feel really good about eating, too, which somehow makes it taste even better.

Fall Minestrone
adapted from My Recipes

1 tablespoon vegetable oil
1 cup chopped onion
1 cup diced carrot
2 1/2 cups cubed sweet potato (about 1 large sweet potato)
2 garlic cloves, minced
Salt and pepper to taste
1 teaspoon dried Italian seasoning
1 tablespoon tomato paste
6 cups chicken stock
1 cup frozen green beans
1 16-ounce can cannellini beans or other white beans, rinsed and drained
1/2 cup uncooked ditalini pasta
2 cups baby spinach

Parmesan cheese, if desired

1. Heat the oil in a large Dutch oven over medium-high heat. Add onion, carrot and sweet potato; sauté until potatoes are nearly tender. Add garlic; cook and stir for 30 seconds or until fragrant. Season with salt and pepper to taste and Italian seasoning. Reduce heat to medium, add tomato paste and stir until vegetables are evenly coated and paste turns a rich brown color.

2. Add chicken stock and green beans; return to medium-high heat and bring to a boil. Reduce heat to medium and add cannellini beans and ditalini. Cook until ditalini is al dente, about 10 minutes. Stir in spinach until wilted. Taste for seasoning and reseason as necessary. Ladle into bowls and sprinkle individual servings with cheese, if desired.

Print

Sunday, October 10, 2010

Weekly Meal Planning, Week of 10.11.10

Well, this is not going to be the healthiest week in our house. For the first time in a long time, I let my husband populate our menu with all of his favorite things. He’s worked pretty hard lately and he totally deserves a week of his favorite foods. The exception is Wednesday’s dinner, which is based on a yummy sandwich I had at a restaurant one day a couple of weeks ago and haven’t been able to get out of my mind since.

Monday: Cornmeal-crusted chicken with jalapeno popper sauce, taco rice

Tuesday: Cheese tortellini with spicy sausage tomato sauce (a jar of pasta sauce and a pound of spicy sausage sautéed with onions, garlic, and red bell pepper), garlic bread

Wednesday: Spinach artichoke chicken melts, chips

Thursday: Smothered chicken, rice pilaf

Friday: Pizza night

Saturday: Chili, Monterey ranch bread (I’ve made this bread before and we all loved it but I took terrible pictures, so hopefully I’ll get some better ones this time.)

Sunday: Bacon cheeseburger meatloaf, ranch macaroni and cheese (recipe coming up this week!), steamed broccoli

Friday, October 8, 2010

Apple Week: Pumpkin-Apple Streusel Cake

To finish up Apple Week, I present to you the ultimate fall dessert: pumpkin-apple streusel cake. It has pumpkin. It has apples. It has streusel. And it has spices. In a word, it is perfection.

The dessert starts with a dense, moist pumpkin cake, which is topped with a layer of spiced sweet-tart apples, which are topped with a crumbly streusel topping. All of the flavors combine perfectly so that you get a little taste of autumn with each bite. The only thing that could improve this in any way would be the addition of some pecans, so if you make this (which you definitely should), add some to the streusel.

I hope you enjoyed Apple Week. These themed weeks are really fun for me to do, so I have a few questions for you: What ingredient would you like to see highlighted for October or November? Would you like a week of pumpkin recipes, or possibly a Halloween Week like I did last year? What other ingredients, sweet or savory, would you like to see featured in coming months? (Just don’t say truffles or caviar. I am on a budget, you know.)

Pumpkin-Apple Streusel Cake
from Epicurious

For the apples:
3 tablespoons unsalted butter
4 cups diced peeled cored Granny Smith apples (about 4 large)
3 tablespoons sugar
1 teaspoon ground cinnamon

For the cake:
1 1/2 cups all purpose flour
1 cup firmly packed golden brown sugar
1/2 cup (1 stick) unsalted butter, cut into pieces, room temperature
1/2 teaspoon salt
3/4 cup canned pure pumpkin
1/3 cup sour cream
2 tablespoons sugar
2 teaspoons pumpkin pie spice
1 teaspoon baking soda
2 large eggs

1. For the apples, melt butter in large nonstick skillet over medium-high heat. Add apples; sauté until apples begin to brown, about 5 minutes. Add sugar and cinnamon and sauté until golden brown, about 3 minutes longer. Cool.

2. For the cake, preheat oven to 350 degrees. Butter 9-inch-diameter springform pan. Combine flour, brown sugar, butter, and salt in large bowl. Using electric mixer, beat until mixture resembles coarse meal. Set aside 2/3 cup of mixture for topping. Beat pumpkin, sour cream, 2 tablespoons sugar, spice, and baking soda into remaining flour mixture, beating just until smooth. Beat in eggs. Transfer batter to pan. Scatter apples evenly over top. Sprinkle reserved topping over apples.

3. Bake cake until topping is golden brown and tester inserted into center comes out clean, about 1 hour 10 minutes. Cool cake in pan on rack 20 minutes. Run knife around pan sides to loosen cake. Release pan sides from cake. Transfer cake to platter. Serve warm or at room temperature with ice cream.

Print

Thursday, October 7, 2010

Apple Week: Apple Pie Cookies


What kind of Apple Week would be complete without a good old apple pie? Well…this one. I just haven’t had the time to make an apple pie for, well, EVER, but in place of a traditional pie I offer you this fun recipe for apple pie cookies.

These cookies were so much fun to make. I was smitten with this idea as soon as I saw it. I added lemon zest to the dough (and it needed it; I think it would have been too bland otherwise), and I made the cookies circular instead of apple-shaped. I even used a fork around the edges to make these look even more like little hand pies. (And I sprinkled cinnamon sugar on the top, because I can think of few things that aren’t improved by a little bit of cinnamon sugar.)

I wish I could have gotten a picture of Andrew’s face when he bit into one of these cookies and discovered the sweet, apple-y filling inside. He was delighted! And that’s what these cookies are, in a nutshell: a surprising little delight.

Apple Pie Cookies
adapted from Taste of Home

For the sugar cookies:
1/2 cup shortening
1 cup sugar
1 egg
1/2 cup milk
1 teaspoon vanilla extract
1 teaspoon lemon zest
3 1/2 cups all-purpose flour
2 teaspoons cream of tartar
1 teaspoon baking soda
1 teaspoon salt

For the filling:
1/2 cup packed brown sugar
2 teaspoons all-purpose flour
1/2 teaspoon ground cinnamon
3 medium tart apples, peeled and grated (about 2 cups)
3/4 cup water

1. In a large bowl, cream shortening and sugar until light and fluffy. Beat in the egg, milk, vanilla and lemon zest. Combine flour, cream of tartar, baking soda and salt; gradually add to creamed mixture. Divide in dough in half. Refrigerate for 2-3 hours or until easy to handle (dough will be soft).

2. Meanwhile, in a small saucepan, combine the filling ingredients. Cook over medium heat until apples are softened and mixture is thickened; cool.

3. On a lightly floured surface roll out each portion of dough to 1/8-in. thickness. Cut with a floured 2 1/2-inch cookie cutter. Place 2 inches apart on ungreased baking sheets. Spread with 2 teaspoons of filling to within 1/4 inch of edge. Top with another cutout seal edges.

4. Bake at 375 degrees for 10 to 12 minutes or until lightly browned. Remove to wire racks to cool completely. Sprinkle with cinnamon sugar, if desired. Makes 2 dozen cookies.


Print

Wednesday, October 6, 2010

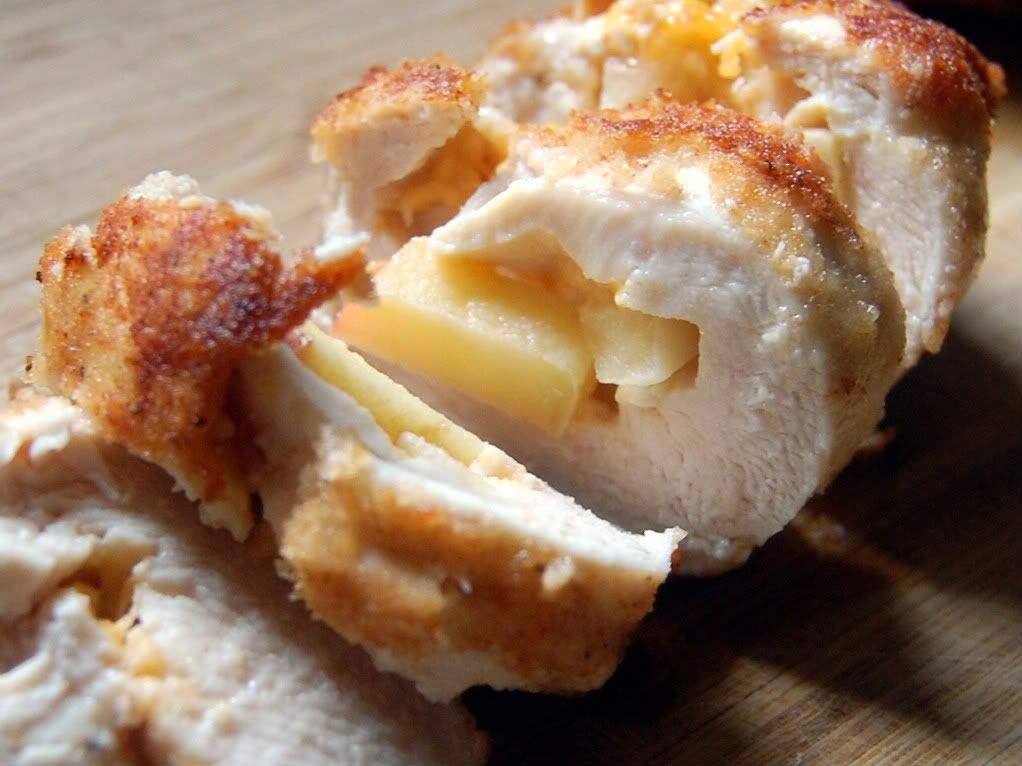
Apple Week: Apple- and Cheddar-Stuffed Chicken

I couldn’t let the week pass without sharing a savory apple recipe with you, and the one I chose turned out to be delicious. This cheddar- and apple-stuffed chicken has the perfect balance of flavors: It’s buttery from the cracker coating, sweet from the apples, and sharp and tangy from the cheddar.

If you’ve never tried cooking with apples in savory dishes, you should definitely give it a shot. Apples are perfect with pork (like in these sausage-stuffed apples), and they also pair nicely with the sweetness of shellfish (like in this scallop saltimbocca). And don’t even get me started on how much I love putting apples in stuffing! Chicken and apples is another natural pairing, since chicken is such a mild meat that it takes on the flavor of whatever you pair it with. In this dish, the chicken takes on the flavors of apples and cheese, and the result is delicious.

I chose a sweet Honeycrisp apple to use in my filling, because I thought the sweetness would pair nicely with sharp cheddar. It did! Give this chicken a try; it’s so quick and easy, and I promise you’ll be tantalized by this combination.

Apple- and Cheddar-Stuffed Chicken
inspired by Taste of Home

4 chicken breast halves, pounded to 1/4-inch thickness
1 cup diced sweet apples
1/4 shredded sharp cheddar cheese
Salt and pepper to taste
1 egg
1/2 cup crushed buttery crackers (like Ritz)
1/2 cup breadcrumbs

1. Preheat oven to 350 degrees.

2. Combine apples and cheese in a medium bowl; sprinkle 1/4 of the mixture over the top of each flattened chicken breast. Roll chicken up and secure with toothpicks. Season with salt and pepper to taste.

3. Combine crackers and breadcrumbs in a shallow dish and scramble egg in another. Dip each chicken breast in egg, then in cracker mixture.

4. Shallow-fry chicken in olive oil or vegetable oil just until all sides are browned; transfer to a rack on a baking sheet. Cook in pre-heated oven until chicken is cooked through, about 15 minutes.

Print

Tuesday, October 5, 2010

Apple Week: Toffee Apple Dip

I guess I’m technically cheating with this recipe. It doesn’t actually contain apples, but its entire purpose is to serve as a dip for apples. So that counts, right? Regardless, this is too delicious not to share, during Apple Week or any time. I could have eaten this with a spoon.

...Okay, here’s the actual truth: I did eat this with a spoon. I forwent the apples for a good portion of this and just ate spoonfuls of it. That’s how good it was. It’s so sweet and creamy and warm-tasting, the perfect balance to crisp, tart Granny Smith apples. It reminds me quite a bit of chocolate chip cookie dough dip, but this version has toffee bits in addition to chocolate. YUM.

Make this. You won’t be sorry. Just be aware that if you have less than one iota of willpower, you’ll be eating it with a spoon. Fair warning. Thanks for a great recipe, Leigh!

Toffee Apple Dip
from One Day at a Time – From My Kitchen to Yours

2 8-ounce packages cream cheese, softened

3/4 cups brown sugar
1/4 cup white sugar
1 teaspoon vanilla
1 package Heath chocolate-toffee bits
Sliced tart (Granny Smith) apples

Combine ingredients in a large bowl. Serve with apples and refrigerate leftovers.

Print

Monday, October 4, 2010

Apple Week: Apple Cinnamon Cream Cheese Muffins

As I mentioned yesterday, I thought it would be fun to do a whole week of apple recipes this week. I know most food bloggers’ minds automatically click to “pumpkin” when October arrives, but indulge me for a week, all right? And get ready for some delicious apple-y treats!

I bookmarked this muffin recipe last fall, but I never got around to making it. Needless to say, I never forgot about these muffins, and they were the first thing I wanted to try this year. And I’m so glad I finally made them, because these muffins are so good. Based on some of the Allrecipes reviewers’ comments, I amended the recipe a bit, and the result was a moist, flavorful, sweet and tangy and spicy muffin. They made a great on-the-go breakfast, and we all really liked them. I’ve since seen a similar muffin recipe I’d like to try (I really love the streusel topping on them), so if I try them I’ll let you know what I think.

Apple Cinnamon Cream Cheese Muffins
adapted from Allrecipes

3 ounces cream cheese, softened
3/4 cup sugar
2 eggs
1/2 cup milk
1/4 cup butter or margarine, melted
1 teaspoon vanilla extract
1 1/2 cups all-purpose flour
1 teaspoon baking powder
1/2 teaspoon baking soda
1/2 teaspoon salt
1 teaspoon cinnamon or apple pie spice
1 cup peeled, diced tart apples

1 1/2 teaspoons sugar
1 teaspoon ground cinnamon

1. In a mixing bowl, combine the cream cheese and sugar. Mix until smooth and creamy, then add eggs, milk, butter, and vanilla; beat until smooth. Combine the flour, baking powder, baking soda, salt, and cinnamon or apple pie spice; stir into cream cheese mixture just until moistened. Fold in apples.

2. Fill greased or paper-lined muffin cups two-thirds full. Combine 1 1/2 teaspoons sugar and 1 teaspoon cinnamon; sprinkle over batter. Bake at 375 degrees for 20 to 25 minutes or until a toothpick comes out clean. Cool for 5 minutes before removing from pan to a wire rack.

Print

Sunday, October 3, 2010

Weekly Meal Planning, Week of 10.4.10

Can you believe it's October already?! This whole year has just flown by. I can't believe it's almost 2011!

Last week wasn’t great, menu-wise and life-wise. The boys were sick, I was sick, no one slept, no one felt like cooking. Three of the meals I’d planned fell by the wayside, so one of them is on the menu again this week. Everyone is feeling better now and we’re all getting a little sleep again, so hopefully I’ll be able to stick to our meal plan.

Coming up on the blog this week, I’ll be doing something special: an entire week of apple recipes! I’ve been cooking and baking with apples a lot this season, and I want to share the recipes with you before everyone -- myself included -- switches over to the “all pumpkin all the time” mindset. I’ve been making some truly yummy apple-icious treats, and I can’t wait to share them with you!

Monday: Ranch chicken, roasted potatoes, steamed broccoli

Tuesday: Black bean and salsa soup, cheese quesadillas

Wednesday: Sloppy joes, tater tots

Thursday: Crock pot coq au vin, mashed potatoes

Friday: Pizza night

Saturday: Pulled chicken suiza sandwiches, tortilla chips with bacon guacamole

Sunday: Pesto chicken stuffed shells

Friday, October 1, 2010

Parmesan-Crusted Stuffed Chicken

Yep. Another stuffed chicken recipe. I just can’t get enough of stuffed chicken, it seems. There are just so many delicious ingredient combinations, and it’s such a great way to add flavor to a bland chicken breast. In this version, chicken breasts are filled with a blend of spinach, cream cheese, and mozzarella, and then they’re rolled in a buttery, salty, crumbly crust of crackers and parmesan cheese. And they’re baked, so they’re a lot healthier for you. There’s nothing not to love.

In the interest of full disclosure, I should tell you that I served these atop a pile of Pasta Roni’s parmesan cheese noodles, to which I added about half a cup of store-bought marinara. And it was delicious. And I am unashamed.

Parmesan-Crusted Stuffed Chicken
adapted from Kraft Foods

4 ounces cream cheese, softened
1 package frozen chopped spinach, thawed and well-drained
1 cup shredded mozzarella cheese

6 tablespoons grated parmesan cheese, divided
Salt and pepper to taste
6 small boneless skinless chicken breast halves (about 1 1/2 pounds), pounded to 1/4-inch thickness
1 egg
10 Ritz crackers, crushed (about 1/2 cup)
Spaghetti sauce, if desired

1. Heat oven to 375 degrees.

2. Mix cream cheese, spinach, mozzarella, 3 tablespoons parmesan, and salt and pepper to taste until well blended; spread onto chicken breasts. Starting at one short end of each breast, roll up chicken tightly. Secure with wooden toothpicks, if desired.

3. Beat egg in shallow dish. Mix remaining parmesan and cracker crumbs in separate shallow dish. Dip chicken in egg, then roll in crumb mixture to evenly coat. Place, seam-sides down, in 13 x 9-inch baking dish sprayed with cooking spray.

4. Bake 30 minutes or until chicken is done. Remove and discard toothpicks, if using. Serve chicken topped with spaghetti sauce, if desired.

Print