Wednesday, June 30, 2010

Pico de Gallo

This recipe is so simple, I feel sort of silly even posting it. But I think everyone needs a good pico de gallo recipe, and this is my go-to. I’ve made it tons of times and love it so much that I thought it was high time to give it a post of its own.

As is true of most of the Pioneer Woman’s recipes, this couldn’t be simpler or more delicious. This pico de gallo is great served with tortilla chips, mixed with some mashed avocado for guacamole, or even as a topping for sandwiches (like these). Mmmm, so good -- I could use a bag of tortilla chips and a bowl of this yummy stuff right now!

Pioneer Woman’s Pico de Gallo
source: slightly adapted from The Pioneer Woman Cooks!

5 Roma tomatoes
1 small onion
2 jalapeno peppers
Cilantro
Lime juice
Coarse salt to taste

1. Chop jalapenos, tomatoes and onions into a very small dice. Chop cilantro. Add all of the ingredients to a large bowl and stir.

2. Squeeze the juice of half of one lime into the bowl. Add salt to taste and stir again. Refrigerate until serving.

Tuesday, June 29, 2010

Elvis Milkshakes

I love getting lost in a really good food blog, spending hours and hours in the archives bookmarking recipes to try. One of my favorite food blogs to do that with is Noble Pig; Cathy’s food always looks so amazing, and every time I visit her site I go away salivating. Our incredibly hot weather has made me pretty much obsessed with ice cream in all its various forms, so when I saw these milkshakes on Cathy's site I knew I had to give ‘em a try.

Whether or not you’re a fan of Elvis, I guarantee that you’ll be a fan of these milkshakes. They’re so delicious -- incredibly rich and creamy and perfectly satisfying on a hot day. I’ve made them quite a few times now, and they’re always a huge hit with my husband and oldest son. You should hear Andrew say "Elvis shakes" -- it’s priceless, and that alone is worth the calories. Next up? Teaching him to sing "You Ain't Nothin' But a Hound Dog."

Elvis Milkshakes
source: Noble Pig

1/2 cup smooth peanut butter

3/4 cup milk, divided
2 cups vanilla ice cream
1 banana

1. In a bowl, beat peanut butter and 1/4 cup of milk with a hand mixer until smooth. In a blender, blend ice cream, remaining milk and banana until smooth.

2. Add peanut butter mixture to ice cream mixture and blend until just combined.

3. Pour into glasses and garnish with banana slices.

Monday, June 28, 2010

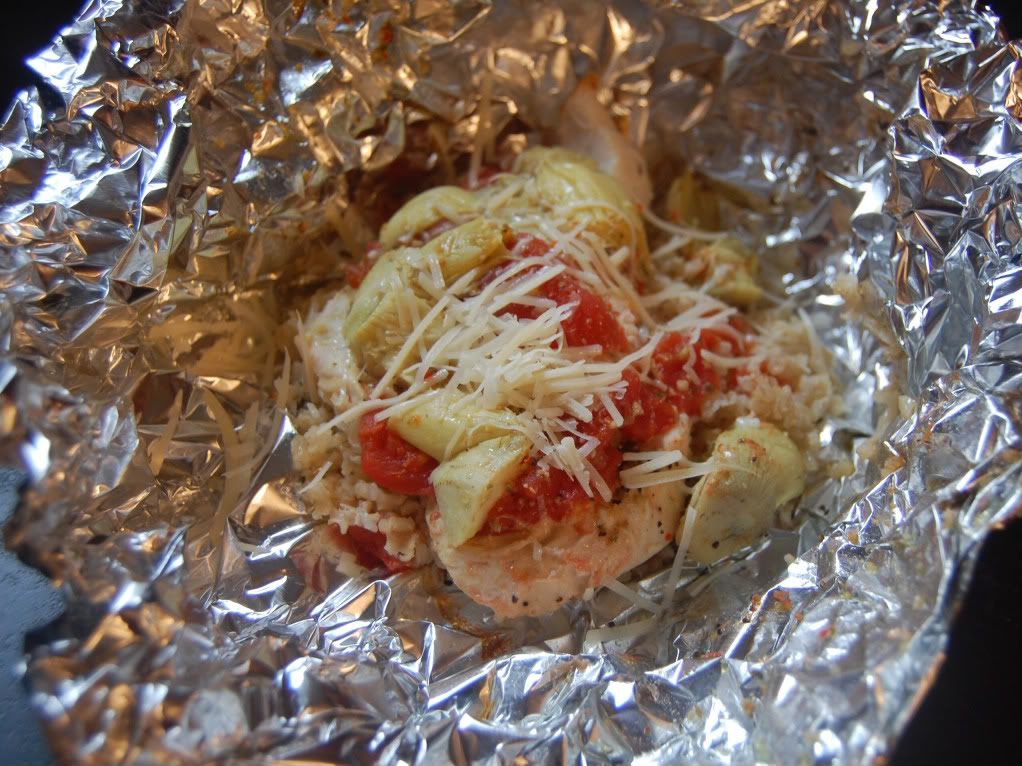
Foil-Pack Chicken with Artichokes, Tomatoes, and Rice

It seems like I’m all about the rice dishes lately, huh? I’ve now posted three rice-centric recipes in a row. Hopefully later this week I’ll have a little bit more variety for you!

I’m a huge fan of foil-packet dinners like this -- they’re sort of like one-pot wonders, only wrapped in foil instead. This is a complete meal in one, with chicken, vegetables, a starch, and even a delicious sauce. We all really liked this meal a lot. I pretty much stuck to the original recipe, except I used brown rice, adjusted for serving size and added a sprinkle of cheese to the top of each packet (because cheese makes everything better, right?). This was so incredibly low-maintenance, and really flavorful and delicious too. Can’t beat that!


Foil-Pack Chicken with Artichokes, Tomatoes, and Rice
source: adapted from Kraft Foods

1 1/2 cups instant brown rice, uncooked
1 1/2 cups warm chicken stock
3 small boneless skinless chicken breast halves, 1/2 inch thick
Salt and pepper to taste
1 can artichoke hearts, drained, quartered
1 can diced tomatoes, drained
1/2 cup Italian dressing
1/4 cup pesto
Parmesan cheese

1. Heat oven to 400°.

2. Mix rice and chicken stock; spoon onto centers of 3 large sheets heavy-duty foil. Top with chicken. Season with salt and pepper to taste, then top chicken with artichokes and tomatoes; drizzle with combined dressing and pesto.

3. Bring up foil sides. Double fold top and both ends to seal each packet, leaving room for heat circulation inside. Place on a baking sheet with rimmed edges.

4. Bake 30 to 35 minutes or until chicken is done. Remove packets from oven; let stand 5 minutes. Cut slits in foil with sharp knife to release steam before opening. Sprinkle with parmesan cheese.

Sunday, June 27, 2010

Weekly Meal Planning, Week of 6.28.10

Oh man. I've been off work for the past four days, and the only good thing about facing a full week of work is knowing how much delicious food we'll be eating.

Monday
: Roasted bell pepper pasta

Wednesday, June 23, 2010

Salsa Rice Burritos

I don’t have a whole lot to say today. The weather here is pretty gloomy right now, which usually I don’t mind at all (I’m one of those weird people who loves cloudy days and thunderstorms and rain), but today it’s just making me feel blah. It’s been a long week so far.

Anyway, on days when I feel like this, these burritos are just the kind of thing I want to make for dinner. They’re quick, easy, delicious, and my favorite kind of comfort food. I think these took maybe 10 minutes to make. They were a big hit with all three of us, and Andrew even devoured the leftovers for lunch the next day. This will definitely be one of my quick go-to meals in the future, especially since I always have all of the ingredients on hand. Enjoy!

Salsa Rice Burritos
source: adapted from Betty Crocker

1 jar of salsa
1 1/2 teaspoons chili powder
1 teaspoon cumin

1 cup uncooked instant rice
1 can black beans, drained and rinsed
1 can whole kernel corn with red and green peppers, drained
1 1/2 cups shredded cheddar cheese
Handful of chopped cilantro
1 package flour tortillas for burritos (8-inch)

1. In 10-inch skillet, heat salsa, cumin and chili powder to boiling. Stir in rice; remove from heat. Cover and let stand 5 minutes. Stir in beans, corn, cheese and cilantro.

2. Spoon about 1/2 cup rice mixture onto center of each tortilla. Fold up bottom of each tortilla; fold over sides. Serve with salsa and sour cream.

Monday, June 21, 2010

Primavera Risotto with Fried Eggs

Here it is, the first day of summer, and the recipe I’m sharing with you has the word “spring” in the title. D’oh!

Regardless of the fact that this is called a spring risotto, it's actually something that I would eat at any time during the year. In the spring and summer you can take advantage of all the fresh vegetables available at the farmers’ markets, and in the fall and winter it’s the perfect comforting dish to help you warm up on a chilly day. I’ve been sort of obsessed with fried eggs lately, but I don’t think I’m biased when I say that the egg on top of each serving is truly what “makes” this risotto. I love how the gooey yolk soaks down into the rice and coats the vegetables, adding a ton of flavor and an extra dimension of creaminess. The only thing I would do next time is add some sweet corn. I think it would work really well with the other flavors.

We love risottos of all kinds, but this one was particularly popular in our house. I’ll definitely make it again!

(One note: This recipe makes a ton of risotto. If you don’t do leftovers, you should definitely halve it.)

Primavera Risotto with Fried Eggs
source: slightly adapted from Epicurious

5 tablespoons butter, divided
2 cups chopped button mushrooms (about 5 ounces)
1 small onion, chopped
3 garlic cloves, minced
2 cups arborio rice
1/2 cup dry white wine
3 cups vegetable broth, divided
3/4 cup sliced carrots
2 cups asparagus, each spear chopped into 3 equal pieces
3 cups (or more) water
1 cup freshly grated Parmesan cheese plus additional for serving
1/2 cup shelled fresh peas or thawed frozen peas
4 large eggs

1. Melt 1 tablespoon butter in medium skillet over medium-high heat. Add mushrooms; sauté until tender, about 5 minutes. Season mushrooms with salt and pepper. Set aside.

2. Melt 3 tablespoons butter in large pot over medium heat. Add onion; sauté until beginning to soften, 5 minutes. Add garlic; stir 1 minute. Add rice and stir until translucent at edges, 5 minutes. Add wine. Stir until liquid is absorbed, 1 minute. Add 1 cup broth. Simmer until broth is absorbed, stirring often, 3 to 4 minutes. Add carrots, asparagus, and 1 cup broth. Simmer until liquid is absorbed, stirring often, 5 to 6 minutes. Continue to add remaining broth, then water, 1 cup at a time, until rice is just tender and mixture is creamy, stirring often and letting almost all liquid be absorbed after each addition, about 25 minutes total.

3. Stir 1 cup cheese, peas, and mushrooms into risotto. Season to taste with salt and pepper.

4. Heat 1 tablespoon butter in large skillet over medium heat. Cook eggs, flipping once during cooking time, until whites are cooked through and yolks are cooked to desired doneness.

5. Mound risotto on plates. Using back of spoon, make hollow in top of each mound. Top each with egg.

Sunday, June 20, 2010

Weekly Meal Planning, Week of 6.21.10

Here's the menu plan really quickly today, since we have lots of fun Father's Day activities planned. I hope you all have wonderful days celebrating the fathers in your lives!

Monday
: Hash brown omelet, toast, fruit smoothies

Friday, June 18, 2010

Burger and Fries Friday: Spinach and Feta Veggie Burgers with Roasted Red Pepper Mayonnaise

Happy Friday everyone! I don’t know about all of you, but I am definitely ready for the weekend. It feels like this has been a long week.

The burger I’m sharing with you today definitely requires that you keep an open mind: It’s a veggie burger. It contains no meat of any kind. Probably not the best recipe to share with you right before Father’s Day, right? Most dads want meat, after all. The dad that I live with –- my husband –- was understandably skeptical about this burger. But then he tried it, and his response was, “Hey, this actually isn’t bad.” I consider that a success!

This is a great burger to make during the summer months, because it’s easy to prepare and only cooks for a few minutes, so it doesn’t heat up your kitchen too much. It also tastes really, really good. Spinach and feta is one of those classic, made-for-each-other combinations, and they really work in harmony in this burger. The stuffing mix and herbs also add a ton of great flavor. I decided to make a quick compound mayonnaise with a roasted red pepper to top ours with, which was delicious.

I was surprised by how much we all really liked these. They went over really well in our house –- so well that I think I’ll be making them again at some point. Give ‘em a try; I don’t think you’ll be disappointed!


Spinach and Feta Veggie Burgers with Roasted Red Pepper Mayonnaise
source: adapted from Better Homes and Gardens

1/4 cup olive oil
1 clove garlic, minced
1 teaspoon dried oregano
Salt and pepper to taste
1 cup herb-seasoned stuffing mix
2 eggs, lightly beaten
1 10-ounce package frozen chopped spinach, thawed and well drained
1/2 cup feta cheese, crumbled
4 hamburger buns

1/2 cup mayonnaise
1 roasted red pepper, patted as dry as you can get it

1. In medium bowl combine oil, garlic, oregano, and salt and pepper. Stir in stuffing mix to coat thoroughly. Stir in egg, spinach, and 1/2 cup crumbled feta; mix well. Shape into four 1/2-inch-thick patties.

2. Heat a griddle or large nonstick skillet over medium heat. Add patties. Cook for 3 to 4 minutes per side or until browned and heated through.

3. Meanwhile, in a blender or food processor, combine mayonnaise and roasted red pepper; pulse until well-mixed.

4. Serve burgers on buns topped with mayonnaise.

Thursday, June 17, 2010

Chocolate Cherry Cake with Fudge Frosting

When I saw this cake on The Sisters’ Cafe, I wanted to make it before I even read the recipe. And then I read the recipe and saw how easy it was, and I knew I’d be making it sooner rather than later. I also knew that we would all love it, and I was right. We did.

Brittany, the sister who posted the recipe, had never heard of this cake before –- and neither had I. It’s absolutely genius to use cherry pie filling in place of the oil called for in the cake mix. The result is a flavorful, moist, delicious chocolate cake. Next time (and there will definitely be a next time) I’m going to try it with strawberry pie filling; I think that would taste amazing. And the frosting! I should write a poem declaring my love for this frosting. It’s so rich and fudgy.

The only change I made to the recipe was to use vanilla extract instead of almond -– I had a bad experience with almond extract recently (I used too much in a recipe, and it was overkill), so I’m staying away from it for now.

Make this for dessert tonight. It’ll take you five minutes to mix up, and you won’t believe how good it is.

And for more chocolate cherry love, try these yummy cookies!

Chocolate Cherry Cake with Fudge Frosting
source: adapted from The Sisters’ Cafe

1 box of devil's food cake mix
1 20- or 21-ounce can cherry pie filling
1 teaspoon vanilla or almond extract
2 eggs

1 cup white sugar

5 tablespoons butter
1/3 cup milk
1 cup semi-sweet chocolate chips

1. Heat oven to 350 degrees. Grease a 9 x 13-inch pan.

2. In a large bowl, combine dry cake mix, cherry pie filling, eggs, and vanilla or almond extract. Stir by hand until well blended. Pour batter into prepared pan.

3. Bake for 25-30 minutes or until toothpick inserted in center comes out clean.

4. To make the frosting, in a small saucepan, combine sugar, butter, and milk. Boil, stirring constantly, for 2 minutes. Remove from heat and stir in chocolate chips until smooth. Immediately pour over partially cooled cake.

Wednesday, June 16, 2010

Zucchini-Wrapped Pork Chops with Pesto, Tomato, and Mozzarella Cheese

I find a lot of great recipe ideas on the Better Homes and Gardens website. However, one thing I’ve recently noticed about the recipes there is that I can never make them exactly as written, because they always seem too plain. It’s hard for me in general to follow any recipe exactly, but I’ve noticed it happens on an even greater scale with BHG recipes. This cheesy broccoli and rice is a great example, and these pork chops are another one.

The original recipe calls for only zucchini and pesto on the pork, but I thought it needed a little something more. Two of my favorite ingredients with pesto are mozzarella cheese and tomatoes, so I added those to the top of the pork. And the result? Out-of-this-world delicious! I ate two pork chops and probably could have eaten a third. This same method would actually work really well with chicken, too.

Joe didn’t like these quite as much as I did, but I think that’s only because he loves the other types of pork chops I make so much. I definitely thought these were delicious, and I’ll certainly be making them again.

Zucchini-Wrapped Pork Chops with Pesto, Tomato, and Mozzarella Cheese
source: adapted from Better Homes and Gardens

1 small zucchini
4 boneless pork loin chops
Salt and pepper to taste
Olive oil
1/3 cup purchased basil pesto
4 slices tomato
1/2 cup shredded mozzarella cheese, divided

1. Preheat oven to 450 degrees. Line a baking pan with foil; set aside. With a sharp knife or vegetable peeler, cut zucchini lengthwise in thin slices (you'll need 4 slices, one for each pork chop).

2. Wrap each pork chop with a zucchini slice, reserving remaining zucchini for another use. Place in prepared pan. Lightly brush with oil; sprinkle with salt and pepper to taste.

3. Roast, uncovered, 18 to 20 minutes, or until meat registers 160 degrees. Spoon some of the pesto over each pork chop. Top each piece with a slice of tomato and 1/8 cup mozzarella cheese. Return to oven until cheese is melted, 3 to 5 minutes.

Tuesday, June 15, 2010

Cheddar Biscuits

If you like Red Lobster’s Cheddar Bay biscuits, then you are absolutely going to love this copycat version. Actually, I think these may be even better than the restaurant version. They come together in no time at all, and they’re incredibly flavorful and completely addictive.

I added parsley flakes, black pepper and onion powder to the biscuit dough, but those were the only changes I made. If you make these, definitely use all of the butter called for in the recipe. It sounds like a lot, but the biscuits soak up a ton of butter, so you really have to slop it on there. Don’t worry about it making them soggy, either; it just makes them really moist and even more flavorful. These biscuits will be making many repeat appearances in my kitchen!

Cheddar Biscuits
source: adapted from Recipezaar

2 cups Bisquick

1 teaspoon parsley flakes
1/4 teaspoon onion powder
1/8 teaspoon black pepper
2/3 cup milk
1/2 cup cheddar cheese

1/2 cup butter, melted
1/4 teaspoon garlic powder

1. Heat oven to 450 degrees.

2. Mix Bisquick, parsley, onion powder, pepper, milk and cheese until a soft dough forms.

3. Drop by spoonfuls onto an ungreased cookie sheet. (I got 10 biscuits out of my dough.) Bake 6-8 minutes or until golden brown.

4. Mix butter or margarine and garlic powder. Brush mixture over warm biscuits before removing from cookie sheet.

Monday, June 14, 2010

Creamy Peas with Bacon

Lately I’ve been trying to do more interesting things with vegetables than steam them or roast them for a side dish, so when I came across this recipe I knew I wanted to try it. We all absolutely loved this, and actually, the peas outshone the chicken that I served them with. I mean, come on: peas, onions and bacon cooked together in a creamy, tangy, flavorful sauce? What’s not to love?

It’s a pretty decadent side dish, not something we should eat every week (even though I really want to, and Joe has already begged me to make this again soon, and Andrew is constantly asking for “More peas, peese,” and Will was practically lunging from his Bumbo seat to try to get a taste), but it’s a nice change of pace from my usual boring side dishes.

Creamy Peas with Bacon
source: adapted from The Hungry Housewife

6 pieces of bacon, chopped
1 onion, finely chopped
2 tablespoons butter
2 tablespoons flour
1 cup chicken stock
4 ounces softened cream cheese
1 bag frozen peas
Salt and pepper to taste

1. Pre-heat a large skillet over medium high heat. Add bacon and sauté until crispy.

2. Add the onions to the skillet and cook until they begin to soften.

3. Add the butter and stir until melted. Reduce heat to medium. Add the flour and cook for 2 minutes, stirring constantly. Add the chicken stock and stir until sauce is thickened and bubbly. Add cream cheese and stir until incorporated.

4. Add the peas and cook for 5 minutes. Season with salt and pepper to taste. Serve.

Sunday, June 13, 2010

Weekly Meal Planning, Week of 6.14.10

Pardon the dust around here over the last few days, guys; I've been playing around with my template. It was time for a makeover! I think I have it exactly how I want it now...What do you think?

Anyway, here's this week's menu. I can tell that summer's upon us, because I'm being drawn to lots of sandwiches and meals that are quick and easy.


Monday
: Italian heroines, potato chips

Tuesday: Skillet tacos, fresh fruit (probably watermelon, if it looks good at the store)

Wednesday: Summer shrimp rolls, potato chips

Thursday: BBQ chicken meatballs, cheesy broccoli and rice. These meatballs have been on my list to make since last summer!

Friday: Leftovers, sandwiches, or take-out

Saturday: Southwestern hash with fried eggs. I think I’ll add in some sausage this time.

Sunday: Father’s Day! So, by request, we'll be having Daddy’s favorite meal: lasagna and garlic bread. (I'm also making him some adorable grill-themed cupcakes...I can't wait to share those with you!)

Friday, June 11, 2010

Grilled BBQ Pepper-Jack Chicken

You know what’s ironic? Every single time we’ve planned to grill so far this year -– every single time -– we’ve been rained out. Our back porch is covered, so technically we could use the grill, but there’s something about rain that just doesn’t put a person in a cooking-out sort of mood.

That’s what happened to us, again, with this chicken. We’d planned to cook this on the outdoor grill, but due to the pouring rain I used the indoor grill instead. I think this would have been much better if it had the extra char and flavor from the grill, but it was still really good. As soon as I saw the recipe, I knew we’d love it; we’re suckers for anything barbecued, and pepper-jack cheese is one of our favorites. Next time I think I’ll incorporate bacon into this in some way, because as we all know, everything is better with bacon. I'll definitely make this again this summer, and hopefully the rain will let up long enough for me to cook it on the grill as it was intended!

Next week I’ll share the creamy peas and cheddar biscuits I made to go with this chicken. Those are both great recipes, so be sure to check back!

Grilled BBQ Pepper-Jack Chicken
source: slightly adapted from Eat at Home

4 boneless skinless chicken breast halves
Grill seasoning to taste
BBQ sauce
4 pepper-jack cheese slices

1. Season both sides of chicken with grill seasoning. Grill the chicken until it's nearly done, then baste with BBQ sauce. Continue cooking until chicken is completely cooked through.

2. Top each chicken breast with a slice of cheese, letting it melt before removing the chicken from the grill.

Thursday, June 10, 2010

Cheesy Broccoli and Rice

I have a great side dish to share with you today. We actually ate this as a main dish, but I think when I make it in the future (which I will, many, many times) I’ll use it as a side.

This stove-top broccoli and rice dish comes together in less than 15 minutes, and it’s so cheesy and creamy and delicious. I was attracted to the original recipe because I love the combination of broccoli and cheese (who doesn’t?), but when I looked more closely at that recipe, I had to stifle a yawn. Bo-ring! I made tons of modifications to jazz it up, and the end result is truly something delicious that we all loved. This is one of my new go-to side dishes. I could use a big serving right now, as a matter of fact!

Cheesy Broccoli and Rice
source: inspired by Better Homes and Gardens

2 tablespoons butter
1 small onion, chopped
1 clove minced garlic
Salt and pepper to taste
1 cup quick-cooking white rice
1 cup chicken broth
1 10-ounce package frozen chopped broccoli
1 cup shredded cheddar cheese
1/2 cup sour cream
1/4 cup parmesan cheese

1. In a medium saucepan, melt butter over medium heat. Add onion and cook until softened and fragrant. Add garlic; cook and stir for 30 seconds. Add salt and pepper to taste.

2. Stir in rice and cook until the edges begin to brown just slightly. Stir in broccoli and chicken broth. Heat to boiling. Remove from heat; cover and let stand 5 minutes.

3. Return saucepan to burner. Over low heat, add cheddar cheese, sour cream, and parmesan cheese, stirring just until cheese is melted. Taste for seasonings and adjust accordingly.

Wednesday, June 9, 2010

Peanut Butter Chocolate Chip Cookies with Pretzel M&Ms

A while ago, Joe came home from work with a bag of pretzel M&Ms. I didn’t even know such a product existed, but I was incredibly eager to try them, since the salty-sweet flavor combination of pretzels and chocolate is one of my very favorites. Needless to say, we all loved them. They’ve since become a staple snack in our house, to the point that every night after dinner Andrew runs to the cupboard where they’re kept and asks for a few for dessert: “Numa-numa-num, peese?” he queries, and there’s just no way I can resist his sweet little voice.

I decided to use some of the M&Ms to make us some cookies. I was thinking of something like a monster cookie, only using the pretzel version of M&Ms instead of the plain ones. But then I decided on a peanut butter cookie base instead, because the only combination I love more than chocolate and pretzels is chocolate, pretzels, and peanut butter.

I was really happy with how these cookies turned out. They have great peanut butter flavor and a wonderful salty-sweetness from the chocolate and pretzels. Like the M&Ms themselves, I think these cookies are quickly going to become a staple in our house!

Peanut Butter Chocolate Chip Cookies with Pretzel M&Ms
source: adapted from Allrecipes

1 cup butter, softened
1 1/2 cups packed brown sugar
2 eggs
1 1/4 cups peanut butter
1 teaspoon vanilla extract
2 1/2 cups all-purpose flour
1/4 cup cornstarch
Pinch of salt
1 teaspoon baking soda
1/2 teaspoon baking powder
1 cup semisweet chocolate chips
1 1/2 cups pretzel M&Ms

1. Preheat oven to 350 degrees.

2. Cream together butter and brown sugar. Beat in eggs, peanut butter and vanilla.

3. Add flour, cornstarch, salt, baking soda and baking powder. Stir in chocolate chips and pretzel M&Ms.

4. Roll into balls about 1 1/2 teaspoonfuls and place onto ungreased cookie sheets about 2 inches apart. Flatten slightly because they do not flatten much while cooking.

5. Bake for 14 minutes.

Tuesday, June 8, 2010

Creamy Red Pepper and Basil Penne with Chicken

I’ve been really into using cream cheese in pasta sauces lately. Of course, I’m always into cream cheese in any way, shape, or form. I put it in everything, even ice cream (stay tuned for that recipe!). Cream cheese is great with pasta, though, because it’s already thick and adds a tangy, slightly sweet flavor to the sauce.

The recipe I’m sharing today is really similar to a pasta dish I’ve already shared, except this recipe uses cream cheese instead of jarred Alfredo sauce. We all loved this. The basil, roasted red peppers, and cream cheese all came together to make a rich, creamy, flavorful sauce for the pasta. And it was ready in the amount of time it took to boil the pasta, so I’ll definitely be adding this one to our weeknight dinner rotation.

Creamy Red Pepper and Basil Penne with Chicken
source: adapted from Kraft Foods

2 cups penne pasta, uncooked
1 7-ounce jar roasted red peppers, well drained
4 ounces softened cream cheese
1/2 cup fresh basil
1/4 cup milk
2 tablespoons grated parmesan cheese
1 pound boneless skinless chicken breasts, cut into bite-size pieces
Salt, pepper, and garlic powder to taste

1. Cook pasta as directed on package.


2. Meanwhile, blend all remaining ingredients except chicken in blender until smooth.

3. Season chicken with salt, pepper and garlic powder and cook in olive oil in a large skillet on medium-high heat until cooked through, stirring frequently.

4. Stir in pepper puree; simmer on medium heat 5 minutes or until chicken is done and mixture is heated through, stirring frequently.

5. Drain pasta. Add to chicken mixture; mix lightly. Sprinkle each serving with additional chiffoned basil, if desired.

Monday, June 7, 2010

Southwestern Hash with Fried Eggs

About a month ago, I came across this recipe on Cara’s Cravings, and I put it on our weekly menu immediately. I’ve been really into baked eggs lately, and this sounded like something our whole family would really love.

But then on the day that I was making this for dinner, I noticed some baby red potatoes in the pantry that needed to be used up, and suddenly the Southwestern stew with baked eggs I’d planned to make became something different entirely: a Southwestern hash with fried eggs. And it was absolutely delicious, and something I will definitely be making again. And again and again. And then? I’ll make it again.

Seriously, this is probably one of my new favorite meals EVER. It’s just so good! I love the idea of putting Southwestern flavors in a potato hash. This version is meatless, but in the future I may add some sausage to this, which I think would make it taste even better.

I love it when a food blogger inspires me to create a new dish. Thank you, Cara, for the inspiration!

Southwestern Hash with Fried Eggs
source: inspired by Cara’s Cravings

1 tablespoon olive oil
4 tablespoons butter, divided
10 unpeeled baby red potatoes, quartered or diced
1/2 teaspoon cumin
1/2 teaspoon chili powder
Salt and pepper to taste
1 onion, chopped
1 clove garlic, minced
1 can corn, drained
1 can black beans, rinsed and drained
1 10-ounce can diced tomatoes with green chilies, drained
4 large eggs
1/4 cup chopped cilantro, divided
1 cup Monterey Jack cheese

1. Heat olive oil and 1 tablespoon butter in a large skillet over medium heat. Add potatoes and season with salt and pepper to taste, chili powder, and cumin. Add onion when potatoes are about half done. Cook until potatoes are cooked through and crispy on the outside and onion is softened. Add garlic; cook and stir for 30 seconds.

2. Reduce heat to low. Add corn, black beans, and diced tomatoes with green chilies. Heat through, stirring occasionally. Stir in about half of the cilantro. Sprinkle cheese over the top of the hash and cover skillet with aluminum foil so the cheese melts.

3. Melt remaining 3 tablespoons of butter in a separate skillet over medium heat. Add eggs (season with salt and pepper if desired) and cook to your desired preference (I fried ours so that the yolks were still runny, but scrambled eggs or sunny-side-up would also be good here).

4. Top each serving of hash with two fried eggs. Sprinkle with remaining cilantro. Serve immediately.

Sunday, June 6, 2010

Weekly Meal Planning, Week of 6.7.10

This week is all about clearing out the good old Google Reader, which has filled up again with all of the delicious dishes my favorite food bloggers are making. I am really, really excited about this week's menu, because it's full of things I've been dying to try.

Monday: 7 can taco soup in the Crock pot. Mine may actually be more like 5 or 6 cans, because I may not use as many beans as the recipe calls for.

Tuesday: Spinach and artichoke macaroni and cheese

Wednesday: Smothered chicken with brown rice, roasted asparagus

Thursday: Creamy roasted tomato pesto pasta, garlic bread

Friday: Leftovers

Saturday
: Southwestern egg rolls

Sunday: Creamy chicken and bacon pastry pockets, salad

Friday, June 4, 2010

No-Bake Cereal Treats

A month or so ago, I stumbled upon Weelicious. I can’t even remember what I was originally searching for; all I know is that I spent at least an hour on the site, paging through all of the delicious, healthy recipes. I immediately added it to my Reader, and when these treats popped up, I knew I had to make them for Andrew immediately.

If you have a toddler, he or she will love these. You will love them, too, and if you’re anything like me, you’ll eat six or seven of them without even realizing you’re doing it. I wanted to get a picture of Andrew eating one to share with you -- and to prove just how much he loved them! -- but honestly, they disappeared too quickly.

The original recipe calls for rice syrup, but that’s not readily available in my local supermarket. I decided to use honey as my sweetener instead, which was delicious. It made the treats pretty sticky, but Andrew and I agreed that their stickiness just made them more fun to eat. Lisa made these too using corn syrup, which she said worked really well, so that’s another alternative.

These were so good, I just may make another batch of them this weekend. I know Andrew wouldn’t complain if I did!

No-Bake Cereal Treats
source: Weelicious

1/2 cup peanut butter
1/2 cup honey
4 cups honey-nut Cheerios

1. Place the peanut butter and honey in a small saucepan over low to medium heat and warm for 2 minutes or until it becomes smooth and combined.


2. Place the cereal in a bowl.

3. Pour the warm peanut butter and honey mixture into the bowl with the cereal and stir to combine.

4. Shape into cookies or place the mixture into a 9 x 9 inch ungreased pan, pat down and then cut into bars. The mixture will harden as it cools.

Thursday, June 3, 2010

Pasta with Asparagus, Lemon and Goat Cheese

Sorry today’s post is up a little later than usual. This day has sort of gotten away from me. Do you ever have days like that? You’re just going along, doing your thing, and suddenly you look down and six hours have gone by.

Anyway, I loved the pasta dish I’m sharing with you today. However, I was the only one in our house who really enjoyed it. Joe isn’t a big fan of lemon in savory dishes, and apparently Andrew is following in his footsteps, because although this dish is full of things he typically loves (pasta, asparagus, and goat cheese), he took one bite and didn’t want anymore. And honestly, I was okay with that, because it just left more for me! Did I mention I loved this pasta?

I made some changes to this recipe, the most notable being that I roasted the asparagus before I added it to the pasta. Pretty much any time a recipe calls for asparagus, you can bet I’m roasting it, no matter what the recipe says. I just love the nutty, rich flavor that roasting the asparagus brings out. My adapted version of the recipe is below.

This pasta dish is light and refreshing and tastes like spring. And it was so quick, too, which made it the perfect meal for a weeknight. Those boys don't know what they were missing.

Pasta with Asparagus, Lemon and Goat Cheese
source: adapted from Epicurious

1 pound penne pasta
1 pound slender asparagus spears, trimmed, cut into 1- to 1 1/2-inch pieces
1 tablespoon olive oil
1 tablespoon melted butter
Salt and pepper to taste
1 tablespoon finely grated lemon peel
1 5- to 5 1/2-ounce log soft fresh goat cheese

1. Preheat oven to 425 degrees. Arrange asparagus spears in a single layer on a baking sheet. Combine olive oil and butter and pour over asparagus. Season liberally with salt and pepper and toss to combine. Roast, tossing as needed, for 15 minutes or until spears are browned and tender.

2. Meanwhile, cook pasta in large pot of boiling salted water until al dente, stirring occasionally.

3. While pasta is cooking, in a large bowl, combine lemon peel and goat cheese. Stir until smooth.

4. Drain pasta, reserving 1 cup cooking liquid. Add hot pasta, asparagus, and 1/4 cup reserved cooking liquid to bowl with cheese mixture. Toss to coat, adding more reserved liquid if dry. Season pasta to taste with salt and pepper.

Wednesday, June 2, 2010

Baked Bean Chili

I know what you’re thinking: She’s posting a chili recipe? In June? And yes, I know it’s not exactly chili weather, but don’t click away just yet, because this particular chili? It has baked beans in it. And to me, baked beans are a quintessentially summer food. Therefore, it’s okay to make and eat this chili in the warmer months. And you definitely should make it, because it’s totally delicious and couldn't be easier.

I was intrigued by the use of baked beans in this chili, and attracted to the fact that they would make this come together in no time. After all, baked beans already have a really thick sauce and tons of flavor on their own, so they’re perfect for chili. I can’t believe I never thought of that before! They add a really nice sweetness to the chili that balances the heat perfectly. I changed the recipe up quite a bit, so my adapted version is below.

We all really liked this, even Andrew, who had two bowls. I have to admit that it’s nowhere near as good as my classic chili recipe, but it’s delicious and quick, and on the hot summer nights that are about to hit us you just can’t beat that.

Baked Bean Chili
source: adapted from Taste of Home

1 pound ground beef
Salt and pepper to taste
1 green bell pepper, chopped
1 white onion, chopped
3 cloves minced garlic
1 envelope chili seasoning
1 28-ounce can baked beans (I used the kind with extra bacon and brown sugar)
1 28-ounce can tomato sauce

1. In a Dutch oven, cook beef over medium-high heat until no longer pink; drain.

2. Return beef to pot along with bell pepper and onion (with a small amount of olive oil, if needed). Add salt and pepper to taste and cook until vegetables are softened. Add garlic; cook and stir constantly for 30 seconds.

3. Stir in chili seasoning, baked beans, and tomato sauce. Bring to a boil. Reduce heat; simmer, uncovered, for 10 minutes.

Tuesday, June 1, 2010

Sweet BBQ Chicken Kabobs

Good morning everyone! I hope you all had fantastic long holiday weekends. I don’t know about you, but I think the Tuesday after a long weekend is so much worse than any Monday. Our weekend was so crazy, I feel like I need at least two days to recover from it! We had so much fun, though.

I have a really delicious chicken kabob recipe to share with you today. This recipe comes from The Sisters’ Café, which is one of my very favorite food blogs. There are five ladies who contribute, and they post yummy recipes so frequently it makes my head spin!

We all really enjoyed these chicken kabobs. I actually broiled them instead of grilling them because it was raining the day I made these (but then, what day isn’t it raining here lately?), and that worked fine, but next time I make them I’ll definitely grill them for the extra flavor. I’ve posted the original instructions below, since I only broiled them out of necessity.

I think our favorite part of these kabobs was the pineapple; it tasted so delicious doused in BBQ sauce, and it was a nice balance to the bell peppers and the chicken. With some rice pilaf on the side, these made for a quick, delicious, and simple dinner. It was affordable, too; I only used one large chicken breast, and I got seven kabobs out of it. I’ll definitely be making them again this summer!

Sweet BBQ Chicken Kabobs
source: slightly adapted from The Sisters’ Café

1 pound boneless skinless chicken breasts, cut into 1 1/2 inch pieces

Salt and pepper to taste
2 cups fresh pineapple chunks (1 1/2 inch)
1 each red and green bell pepper, cut into 1 1/2 inch pieces
1/2 cup BBQ sauce
3 tablespoons orange juice

1. Heat grill to medium-high heat. Season chicken with salt and pepper to taste and thread alternately with pineapple and peppers onto skewers to make kabobs.

2. Mix BBQ sauce and juice and brush some of the sauce mixture onto kabobs. Grill 8 to 10 minutes or until chicken is done, turning and brushing occasionally with remaining sauce mixture.